


HDFURY X3
$179.00
This HDMI to VGA/YUV Kit includes:
- HDFury X3 converter
- BNC, VGA, DB9 extender cable
- Component Cable
- Choice of power supply
- USB > mini USB cable
HDfury Xth Anniversary Edition comes with all YUV and RGBHV extender cables for the first 100 purchase !
Product Description
HDFury X3
The HDfury1 was RGBHV output only with a DVI-D input.
The HDfury2 introduced component (Y/Pb/Pr) output support with HDMI 1.1/1.2 input, colour depth upscaling to render 16-235 as 0-255, stereo sound output in both optical and analog, and supported third party accessories support on its output. The HDfury2 had an RGB output similar to the HDfury1 but with extended colour depth range for better colours.
For the HDfury X3, the component features from HDfury2 were kept while the RGB and audio output were completely re-worked and improved. We are now extremely proud to announce that the LEFT SHIFT issue in RGB mode is NO MORE! The HDfury3 allows users to shift the picture LEFT/RIGHT at will through push buttons. The colour depth upscaling feature is now also user selectable (ON/OFF via DIP switch). The HDfury X3 also features 4 customizable EDID banks, two of which may be used to limit the output resolution to 1080i out of the box (again via DIP switches). A very useful feature for anyone with a display that supports 1080i but not 1080p and has sources that do not offer manual setting of the output resolution. Also included are two HDMI 1.3 inputs with Deep Colour support and MANUAL or AUTO switching. Owners of fussy RGB displays will also be happy to learn that the H/V syncs may also now be force to either positive or negative via DIP switch. The RGB pixelclock bandwidth is greatly improved with 225Mhz support (1080p/72 is now perfectly resolved)!
For information on how to set these options see our HDFury X3 User Manual.
Main features
- 2x HDMI 1.3 input with Deep Colour support (Manual or Auto switch mode available, user selectable)
- Component (YPbPr/YCbCr) and VGA (RGBHV) video output
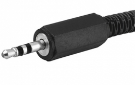
- Sound output in both Analog and Digital Optical (S/PDIF 5.1 Dolby/DTS) through an innovative 3.5mm combo jack
- 4x EDID banks (2 per channel)
- Built-in user selectable output resolution limit settings
- Customisation settings available through DIP SWITCH
- Perfectly and automatically center image in all standard NTSC/PAL component modes
- Manually adjust horizontal screen position in all NTSC/PAL RGBHV modes
- Performs Colour Depth Upscaling in all modes (ON/OFF user selectable)
- Sync Polarity Inverter included
- Automatic SD/HD color-space selection
- Accept third party accessories on its output
- Improved output cable driver for driving long cable runs (40-50′)
- Software upgradeable
Technical Specs
HDFury X3 Specs & Features
Getting Started
Getting Started
No HDMI? No problem! The HDfury X3 upgrades any TV or projector by adding HDMI! Works with any display that accepts either Component (YPbPr/YCbCr) or RGB/VGA! Don’t be stuck watching Blu-ray, DVD, Satellite/Cable at only 480p! Add an HDfury X3 and watch hi-def at up to FULL HD 1080p resolution!
Why do I need HDfury X3?
How old is your HDTV or projector? If it was bought before 2005 it does not have an HDMI input. This means that you’ll never be able to use the full potential of your expensive projector, plasma display, or PC screen with new sources like the PS3, Xbox360, Blu-ray players, Cable TV / Satellite boxes, or PC graphics cards at up to 1080p FULLHD resolution.
Without an HDMI input your display will be limited to 480p in most cases – that’s only 1/6th the resolution of 1080p FULLHD! You need HDfury X3 to unlock the full potential of your display! Why buy an expensive new HDTV when your existing one works perfectly well? Enhance your display’s compatibly and value with HDfury X3!
Designed by a group of home theater videophiles, the HDfury X3 delivers a razor sharp picture with unprecedented colour from HDMI sources, supporting all resolutions up to 1080p FULL HD. The picture quality improvement when using HDfury X3 is immediately obvious, providing an amazingly clear and detailed picture!
Can’t I use the component output on my Blu-ray player and other devices?
- Blu-ray, HD DVD, and DVD players (as well as the Xbox360 and PS3) will not upscale standard DVDs to 1080p over analog outputs. They are limited to 480p output only. The HDfury X3 overcomes this limitation.
- If the Image Constraint Token (copy protection) is enabled on Blu-ray or HD DVD discs reduces resolution from 1080p to 540p (1/5th the resolution) over analog outputs. The HDfury X3 overcomes this limitation.
- And most importantly: The image quality is significantly worse over analog outputs.The HDfury X3 overcomes this limitation.
HDfury X3 is what you need to to add digital HDMI 1.3 to your TV to bring it into the next generation and provide the best image quality possible!
Will HDfury X3 work for me?
1. Does your display support at least one of the following resolutions: 480i, 480p, 576i, 576p, 720p, 1080i, or 1080p?
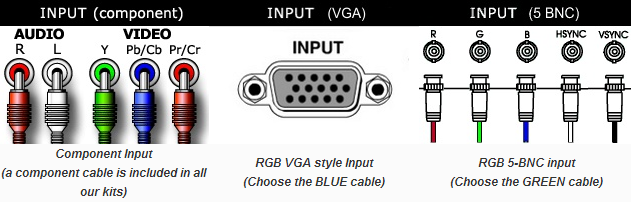
2. Does it have a Component or RGB (PC/VGA) input connector? (some examples shown below)
If you answer YES to both questions then HDfury X3 will work for you!
What’s Included? / Which cables should I order?
Absolutely everything you need is included. You won’t need to find any of the expensive extras to get up and running. Our kits include:
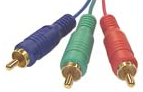
- HDfury X3 Component Cable: For displays with component (Y/Pb/Pr) inputs. Included with every order.
- HDfury X3 RGB Cable: For displays with an RGB (VGA) inputs. Basic Kit gives you a choice of one of three RGB cables:BLUE (VGA to VGA male): For displays with a standard female D-sub VGA style RGB connector. This is the most popular RGB input connector.
GREEN (VGA to 5-BNC male): For displays with 5-BNC input RGB connectors. Used mostly by professional displays.
RED (VGA to Barco Port 3): For Barco CRT projectors only. More information
If your display only has component inputs you will not use the RGB Cable so it doesn’t matter which you order. If your display has 5 RCA style connectors order the GREEN cable and use five BNC to RCA adapters (sold separately).
-
An HDfury X3 power supply is required and included with all our kits. The Advanced Kit also includes a power supply for GammaX.
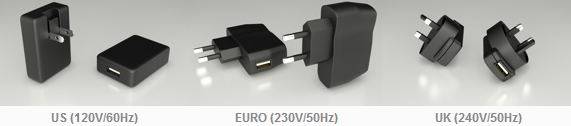
- 6′ USB power cable: Part of the HDfury X3 power supply.
Is HDfury X3 RGBHV output compatible with my Display ? (How to make sure that your display is compatible)
If you are not sure whether or not HDfury X3 is compatible with your PC Monitor, CRT Projector, or Plasma/LCD HDTVs we recommend you to perform the following test:
720p TEST
– Setup a PC computer graphic card to 1280×720 resolution (50 or 60hz depending on your location eg: US : 60hz, Europe: 50hz) through its VGA output in order to see if it displays correctly on your screen throught the VGA input (SUB-D HD15/5xBNC/DB9)
If you can see the output it means that you will be able to display 720p from any HDMI or DVI(HDCP) source on your screen using the HDfury X3 RGBHV output.
1080p TEST
– Setup a PC computer graphic card to 1920×1080 resolution through its VGA output in order to see if it displayed correctly on your screen through its VGA input (SUB-D HD15/5xBNC/DB9)
If you can see the output it means that you will be able to display 1080p from any HDMI or DVI(HDCP) source on your screen using the HDfury X3 RGBHV output.
It has been reported that even though some PC monitors allow higher resolutions to be displayed such as 1920×1200 it does not automatically mean that the display supports a 1920×1080 resolution.
As an example both Dell 2405FPW and Sony P234B are listed as 1920×1200 native resolution. Unfortunately the Dell one does not support a 1920×1080 resolution correctly while the Sony one will display it perfectly.
So once again, performing the above test will allow to find out if HDMI 720p or 1080p could be displayed on your screen with HDfury X3 RGBHV output.
We believe that the EDID of any 1920×1200 monitor could be updated in order to support 1920×1080 resolution. More on that later.
Plasma and LCD HDTVs are oftenly listed as “Supporting 720p/1080i” or “720p/1080i compatible”.
This does not mean that these displays are TECHNICALLY ABLE to handle 1280×720 or 1920×1080 resolution !
In fact most of them are 1024×768 max resolution
Basically those displays will receive a higher resolution signal through their components or VGA input and DOWNSCALE it to 1024×768 (the best supported resolution)
The well designed (often more expensive) displays will DOWNSCALE 1280×720 or 1920×1080 through both VGA and/or component input. (Ex: Panasonic TH-42PH9WK)
However it has been reported that some do not DOWNSCALE signals sent through the VGA input but only through component !
Therefore it is best to use the above test to make sure that the HDfury X3 RGBHV output will work with your display device !
Is HDfury X3 compatible with my Source ?
HDfury X3 is FULLY compatible with all recent HDMI (and/or DVI-D hdcp) source devices such as the PS3, X360 Elite, HD-DVD players, Blu-Ray players, HDMI graphics card and the latest set-top-boxes (STB) and DVD players with HDMI outputs. We recommend that a power supply be used for all sources.
Digital and Analog Link between HDMI Source >[DIGITAL]> HDfury X3 >[ANALOG]> Display
Straight HDMI cable: If you are experiencing problems getting a HDMI signal displayed correctly from a Toshiba HD-DVD player and you call Toshiba, the first thing they will tell you is to “Please remove any HDMI to DVI adapters in your signal path!”
You should ALWAYS use the supplied breakout (extender) cable that shipped with your HDfury X3: No warranty on the quality can be given when using another breakout cable, especially cables that are longer.
My display technically supports 1280×720 (and/or 1920×1080) through its VGA or component input (RGBHV either 5xBNC/Sub-D HD15/DB9) and I’m using a recent HDMI source. Unfortunately I have no picture on the screen.
Once you hooked up HDfury X3 to your display and ran a HDMI cable to your source the first thing you need to check is the Blue led status: Is the Blue LED ON ?
The led indicates that HDfury2 is receiving enough power from the DVI/HDMI source and ensures that device is now operating and outputting a signal. (by default HDfury X3 is set to component output)
If LED is OFF, the HDfury X3 is not working, and therefore no signal is going out to your display.
Reasons could be one of the following:
– Your HDMI source is not set to output through HDMI > (ex: on PS3 you must activate HDMI from the display settings)
– Your HDfury X3 needs to be setup for your source/display, refer to usermanual for step by step instructions: http://www.hdfury.com/docs/HDfury3manual.pdf
Some notes on when you first connect the HDfury 3 in RGBHV !
When you connect the HDfury X3 in RGBHV output mode for the first time you may see the screen shifted to the left > This is normal.
Simply adjust your display’s settings to shift the image back. This needs to only be done once.
On some European CRT displays you will not be able to shift back far enough because of the US/Euro HD ‘porch’ differences.
If this affects you, switch your source to 60Hz to solve the problem. You can setup a new memory and it won’t disturb any of your original settings.
Refer to the usermanual for instructions: http://www.hdfury.com/docs/HDfury3manual.pdf
For example, you can connect HDfury X3 to your PC VGA screen, and you will see that the first time the picture is shifted to the left.
You can then adjust this setting on your PC display, and it will be perfect. If you connect your computer back to the PC VGA screen, the image will centered as before!
Your screen / display has memory functions to store your settings depending on the source. There is no other settings to adjust.
Enjoy ! Good times ^_^
FAQ
Got questions ? We have answers !
General
Why do i need HD (720p) or Full HD (1080p)?
Blu-Ray players, HDMI graphic cards, PS3, Xbox 360 Elite are all able to unleash their true potential (720p/1080p mode) only through the HDMI output. If you want a valid ticket to the Full HD world you either need a compatible display (with HDMI input) or an HDfury X3 for your existing display. 1080p FULLHD as found on Blu-ray and HD has over 6 times the resolution as standard DVD and TV. For the best movie and and home theater experience, you *need* Blu-ray/HD.
Why do i need a HDCP compliant display?
HDMI is a new standard that comes with a form of hardware protection called HDCP. If your display doesn’t have a HDMI input you won’t be able to display 720p/1080p signal on it (from HDMI sources). Prior to exchanging video data, the HDMI source exchanges HDCP keys with HDMI display. Both devices have a special HDCP chip embedded. If your display doesn’t include an HDCP chip, even if it’s technically able to display 720p or 1080p signal, it will display a BLACK SCREEN. On some devices (ex: Playstation3, Xbox360) 1080p mode is only available through the HDMI output.
I use component cables to connect my Blu-Ray or DVD player to my display device and it works just fine! Why do I need HDfury X3?
Blu-Ray and many DVD players can also upconvert standard definition DVDs to higher resolutions (720p, 1080i, 1080p), but they only do this via the HDMI outputs (not component). So if you want to get the higher resolution benefits of your player’s upconversion circuitry, you’re forced to use HDMI. As well, in the future it may not be possible to pass certain high definition content over component video cables. A content flag called the ICT (Image Constraint Token) allows broadcasters and movie studios to limit or “down-res” the HD video signal to standard definition 480P resolution over component video cables. Hollywood has reportedly agreeed to not activate this flag until 2012. And the most important reason to use HDfury X3: The picture quality is substantially better! (Sharper/cleaner/less noise/less ringing/etc). Talk to someone who uses one or read the reviews !
I need an HDMI cable. Can you recommend one?
Blue Jeans Cables make good quality thicker HDMI cables with good shielding (for less loss over long runs).
My picture ‘blanks out’ from time to time when using the HDfury X3. Why is this happening?
If the HDfury X3 blue LED is OFF during the picture blanking, the problem is with the HDfury X3 or the power supply. We will replace them for you.
If the HDfury X3 blue LED is ON during the picture blanking, the problem is with the the component cable, RGB cable or the display.
Lift the little panel found on the back of the HDfury X3 and make sure that DIP switch 6 is set to ON. DIP switch 6 is used to turn the blue LED on/off, make sure it is set to ON if you are experiencing problems with your HDfury X3. The blue LED will never come on if you have DIP switch 6 set to off.
Sound
Do I need to use the sound output on the HDfury X3?
Likely not. The audio output of the HDfury X3 is a convenience feature if you do not have a home theater receiver. The HDfury X3 supports stereo analog output as well as 5.1 Dolby/DTS digital SPDIF output. If all you have are the speakers in your TV you can use the 2-channel analog audio output of the HDfury X3 as a covenient way to feed audio directly into your TV without having to run separate (possibly long) audio cables from the source to your TV as in many setups the HDfury X3 will be plugged right into the TV. This way you only need to run one HDMI cable to the TV and then use a short audio cable from the HDfury X3 to the TV sound input. Anyone with a home theater receiver/pre-amp and separate speakers should instead connect their source devices directly to the receiver/pre-amp and not use the HDfury X3 sound output. You may use the 5.1 Dolby/DTS digital audio output of course if the positioning of your HDfury X3 makes this more convenient. The choice is up to you! Typically there is no need to use the audio features of the HDfury X3 with a home theater setup.
How do I hook up the audio from the HDfury X3?
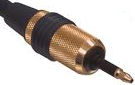
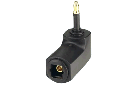
The HDfury X3 has both analog and digital (TOSLINK) audio output in one connector located on the bottom of the unit labelled “D/A” along with a headphone symbol. It’s a 2-in-1 connector meaning that you can plug in either a 3.5mm stereo analog jack or a digital mini-TOLINK (3.5mm mini-jack) cable and get stereo analog sound or 5.1 Dolby/DTS digital sound out of the HDfury X3. See further below for pictures of both types of connectors/cables.
- HDfury X3 3.5mm mini-TOSLINK digital audio cable :
- If you’d like to use a “regular” TOSLINK cable, use a 3.5mm Mini-TOSLINK to regular TOSLINK adapter (not included) :
- A 3.5mm stereo audio cable (not included) is used for connecting the HDfury X3 to a TV if you don’t have a home theater setup (you only have 2 speakers in your TV) :
Inputs and switching
How many inputs does the HDfury 3 have?
Two inputs, both HDMI 1.3 compliant with HDCP with support for Deep Color(TM). The HDfury X3 is the first HDfury to support Deep Colour(TM).
How do I switch between the two inputs?
The switch on the side of the HDfury X3 labelled “1A AUTO 2B” is used to switch inputs or to set the HDfury X3 to switch automatically. To always use input 1A, set the switch
to 1A. To always use input 2B, set the switch to 2B. To have the HDfury X3 autoswitch, set the switch to AUTO.
How does the HDfury X3 auto switching work?
The AUTO position will cause the HDfury X3 to switch automatically to the source device with an active video signal. In the case of two active video signals whichever became active first will be chosen. The HDfury X3 will then remain locked on that input until that source is turned off. In order words: If two sources are active and you wish to switch to the other, turn off the currently active one in order to switch to the other.
Video
What resolutions does the HDfury X3 support?
The HDfury X3 supports any resolution/refresh rate combination (interlaced or progressive) up to 1080p/72Hz in RGB output mode, and 1080p/60 in component (YPbPr) output mode. 1080p/24 is also supported.
Does the HDfury X3 change the resolution? Upconvert or downcovert?
The HDfury X3 does not change the resolution or refresh rate in any way. It converts the HDMI 1.3 digital input signal to an analog RGBHV (VGA) or Component (Y/Pb/Pr) signal. It also provides HDCP decryption if needed. The HDfury X3 outputs whatever resolution you feed it. Feed 1080p in and you’ll get 1080p out. Feed 480i in and you’ll get 480i out.
Does the HDfury X3 support both Component and RGB video output? I thought they were the same?
The HDfury X3 supports both component (Y/Pb/Pr or YUV) and RGBHV (sometimes called VGA) signal types on the output. They are not the same at all and cannot be used interchangeably (more information). Some displays have component inputs, some displays have RGB, some have both. The HDfury X3 lets you choose between the two to best match your display’s requirements.
My picture is all green! What’s going on?
You likely have a display that only accepts RGB and you have the HDfury X3 set to component output (Y/Pb/Pr). Switch it to RGB.
I want to use the component input on my display. How do I set the HDfury X3 to output component (Y/Pb/Pr) video?
Lift the little panel found on the back of the HDfury X3 and set DIP switch 1 to OFF. Make sure to use the HDfury X3 component breakout cable to connect the HDfury X3 to your display’s component (Y/Pb/Pr) input. It is the cable with 3 RCA (phono) style connectors coloured red, green, and blue and looks like this:
I want to use the RGB (VGA) input on my display. How do I set the HDfury X3 to output RGB (VGA) video?
Lift the little panel found on the back of the HDfury X3 and set DIP switch 1 to ON. Make sure to use one of HDfury X3 RGB cables to connect the HDfury X3 to your display’s RGB (VGA) input. Three RGB cables are available: A VGA (D-Sub15) cable, a 5-BNC cable, and a special Barco CRT projector port 3 cable. Do not use the component 3 RCA (phono) style connector as it will not work.
I have a scaler or doubler with DVI/HDMI inputs and an RGB or Component output connected to my display device. I don’t need an HDfury X3 right?
Not true. You still need the HDfury X3 if you want to use HDMI sources such as Blu-Ray or DVD players as they use HDCP (high definition copy protection). The scaler is not allowed to output an analog RGB or Component signal. The scaler will simply TURN OFF its analog output or limit it to 480i resolution. Only the digital DVI/HDMI outputs will remain on. To solve this, connect the HDfury X3 to the DVI/HDMI output of your scaler, and then connect the HDfury X3 to your display device using the analog RGB or Component input. Simple!
I have a scaler or doubler with DVI/HDMI inputs and a DVI/HDMI output connected to my display device’s DVI/HDMI input. I don’t need an HDfury X3 right?
Maybe. You still need the HDfury X3 if you want to use HDMI sources such as Blu-Ray or DVD players that have HDCP-protected content *and* your display device only has a DVI input. The scaler, must pass the HDCP-protected content all the way to your display device. The display device must decrypt the content. If your display device only has a DVI input and it does not support HDCP, it will not be sent a signal. To solve this, connect the HDfury X3 to the DVI/HDMI output of your scaler, and then connect the HDfury X3 to your display device using the analog RGB or Component input. Simple!
I want to connect a longer cable to the output of the HDfury X3. Can I do that?
Yes. The HDfury X3 supports analog output cables up to 40-50 feet in length. The HDfury1 did not allow for longer output cables while the HDfury2 support cables up to 25-35 feet in length.
Does the HDfury X3 support 24fps found in next generation Blu-Ray and HD DVD players?
Yes! While the HDfury1 does not, the HDfury2 and HDfury X3 do support 24fps. With cathodic displays such as CRT projectors or CRT based RPTVs or tube TVs, 24fps is too low of a frequency for the display to use. The image will flicker like crazy and will not be watchable. You must turn off 24fps support in the source when using a CRT based display. You can however use 24fps on a plasma or LCD display and it will be displayed nicely using the HDfury X3! Note however that most displays that do not have HDMI inputs will not work at 24 Hz as 24 Hz support was generally added to displays after HDMI was invented. To turn off 24 Hz, set your source devices to 50 or 60 Hz output and not 24 frames (Hz) or “Automatic”.
I can only get lower resolutions to work. When I set my source to high resolutions like 1080p I don’t get an image!
(1) Make sure to use the included HDfury X3 power supply at all times. It is required at all times.
(2) Many TVs do not support 1080p and must be fed a 1080i or 720p signal instead. Make sure to set your source to 1080i or 720p unless your display’s manual specifically states that it supports 1080p.
(3) Make sure to turn off 24fps (24p) support in the source (see last question).
The picture is blank! I don’t get an image at all from my PS3, Blu-ray player, or other source!
(1) Make sure your display supports the resolution the source is feeding it. If your TV does not support 1080p, set your sources to 1080i or 720p. Some sources will automatically use the highest resolution available to them based on what they see connected, and since they see the HDfury X3 which supports 1080p FULL HD, the source will ‘think’ you have a 1080p capable TV and is most likely feeding the HDfury X3 a 1080p signal. You need to lower this to 1080i or 720p in the source device.
(2) Make sure that the 24fps output option in the source device is set to OFF or DISABLED and not AUTOMATIC unless your TV specifically supports 24fps. Most do not, especially older TVs that do not have HDMI inputs.
(3) Make sure you’re using the HDfury X3 power supply at all times.
I’m still getting a black screen from my PS3 when using the HDfury X3. How can I fix this?
The problem is that you likely connected the HDfury X3 to the HDMI port while the PS3 was still setup to output by another port (component or composite). The result is no picture over HDMI. The PS3 will output low resolution on every output when you reset the display settings this way: PS3 in stand by mode, hold on power for 5 sec until you heard 3 beeps.
The PS3 restarts and you can than access low resolution through both HDMI and/or other ports and perform the display test to choose your preferred resolution. For more information see our HDfury/PS3 Setup Guide.
On my PS3 I can see the menu, play games and blu-ray discs, but I get a blank screen or an out of range error message when I play a DVD.
You need to change a setting in your PS3: In addition to setting up the HDMI resolution on the PS3 as outlined above, you also have to go under the Blu-Ray playback settings and adjust the DVD upscale feature because by default it will also be 1080p. Another hint: When you first connect an HDfury device to the PS3 the PS3 will ask: “A new HDMI device has been detected, do you want to use it?” Answer ‘YES’ ONLY if your TV is 1080p capable. Otherwise answer ‘NO’, and you will be presented with another screen where you will be able to change the resolution settings and set them manually to whatever your TV supports. For more information see our HDfury/PS3 Setup Guide.
My picture is blank when I play back Blu-ray discs but not when I play DVDs. What’s going on?
Blu-ray discs are natively 1080p/24Hz. You likely have your Blu-ray player set to 24Hz or “Automatic” frame rate output so that it is outputting a 24 Hz (fps) signal. Most displays that do not have HDMI inputs do not work at 24 Hz so you need to turn this off. Either set your Blu-ray player to 50 or 60Hz or set ‘Automatic Frame Rate’ to off. See your Blu-ray manual. If you’re using a PS3, see our HDfury/PS3 Setup Guide.
My Sony G90 CRT projector looks funny when I use the HDfury X3.
Go into the G90 service menu “Input Setting” with the fury installed and set the “Clamp” to HP or H/C from auto. This should straighten out the picture if it is varying in brightness and getting weird bands of dark as scenes change.
I can’t get past 1080p on my PC while hooked up from my DVI port to the HDfury X3 even when using PowerStrip. Why not?
In order to go beyond the 165Mhz pixel clock barrier of 1080p/60 from your PC you will need a DUAL LINK DVI to HDMI cable. That’s the cable that has all the pins filled in on the DVI end and had an HDMI plug on the other.
Image shifting
Will the HDfury X3 shift the image to the left or cropped (cut off) in any way like some other converters?
No. Just like the HDfury2, the HDfury X3 includes advanced features to ensure that the image stays perfectly centered when component (Y/Pb/Pr) output mode is used. The HDfury X3 also adds a new feature to allow for manual centering of the image when RGB output mode is used (the HDfury2 did not have this feature).
Does the HDfury X3 automatically center the image?
In component (Y/Pb/Pr) output mode the HDfury X3 always automatically centers the image. Nothing else needs to be done. In RGB (VGA) output mode the L/R image shift control on the side of the HDfury X3 may be used to manually center the image after turning DIP switch number 5 to ON.
The picture is not centered when I use the HDfury X3 in RGB (VGA) output mode. How do I fix it?
Open the DIP switch cover and turn DIP number 5 to ON. Then use the L/R momentary contact switch on the side of the HDfury X3 to shift the image left or right until it is centered. This only needs to be done when you use a new resolution for the first time. The HDfury X3 will then remember the setting for that resolution for the next time you use it. The “theoretical” correct RGB center values are already programmed into the HDfury X3 core so in many cases no shifting will be required, but testing has shown that some TVs do need a slight adjustment. The HDfury X3 is the first HDfury to give you that flexibility.
The L/R image shift doesn’t work!
Make sure the HDfury X3 is set to RGB output mode (set DIP switch 1 to ON) and that the L/R image shift feature is enabled (set DIP switch 5 to ON). See the next question for more information.
Can I disable the L/R image shift feature?
Yes. While the L/R image shifting in RGB mode is enabled by default, some people may choose to disable this feature and do their image shifting in the display or in a video processor instead. To turn off the L/R image shifting feature lift the little panel found on the back of the HDfury X3 and set DIP switch 5 to OFF.
I used the L/R image shifting push button and now I don’t have an image anymore!
You have shifted the image too far resulting in a loss of sync on the display. Hold the shift push button in either direction for approximately 15 seconds and the image will reset to the default center value. Then re-adjust slowly/carefully.
RGB image sync
My display has composite (combined) sync with only 4 BNC connectors, not 5. (Examples: Barco 7xx/Cine7 or Ampro CRT projectors). What cable do I order? How do I hook it up?
Order the GREEN (5-BNC breakout cable) and combine the H/V sync lines using a $2 BNC T-connector like this. You could also use an Extron 109 or 202 box to combine the two sync lines.
The image rolls, is unstable, or doesn’t always lock on. What do I do?
Some displays such as early Electrohome ECP and Barco CRT projectors have fussy sync circuitry. You need to combine the H/V sync lines using a $2 BNC T-connector like this. You could also use an Extron 109 or 202 box to combine the two sync lines.
My display requires the RGB signal to always include negative or positive sync to work. How do I set this?
The HDfury X3 allows you to force the output sync to either positive or negative, or invert it. Previous HDfury models did not alter the sync signal in any way requiring extra hardware if your display has special sync requirements.. To set sync lift the little panel found on the back of the HDfury X3 and set DIP switches 2 and 3 as follows:
– Always invert sync: Set DIP switch 2 to OFF, DIP switch 3 to OFF
– Always positive (high) sync: Set DIP switch 2 to ON, DIP switch 3 to ON
– Always negative (low) sync: Set DIP switch 2 to OFF, DIP switch 3 to ON
How do the two sync DIP switches work?
For those people who want all the details, the two sync DIP switches control RGB image sync as follows:
DIP switch 2: ON=Sync Passed, OFF=Sync inverted (operates after DIP3 selection, so it is possible to invert a forced sync too)
DIP switch 3: ON=Force sync positive (high), OFF=Sync not forced, simply passed.
Colour depth upscaling
Can I turn the colour depth upscaling feature off?
Yes. Like the HDfury2, the HDfury X3 expands the regular 16-235 image range to 0-255 for greater contrast ratio. Some people may want to turn off this feature. To turn colour depth upscaling off, lift the little panel found on the back of the HDfury X3 and set DIP switch 4 to OFF.
Limiting the HDfury X3 output resolution, EDID
Do I need to limit the maximum output resolution that my HDfury X3 supports to 1080i instead of 1080p?
Usually not. If your display supports 1080i but not 1080p simply set your source device to the maximum resolution that your display supports. In other words, if your display supports 1080i but not 1080p, in your source set up menus choose 1080i or uncheck 1080p from the list of supported resolutions. If you’re using a PS3, see our HDfury/PS3 Setup Guide for more information on how to do this.
So why would I want to limit the HDfury X3 resolution to 1080i instead of 1080p?
Two reasons:
(1) Some source devices (such some Samsung Blu-ray players) auto-detect the maximum resolution that the display can support every time the player is turned on and reset their resolution to that maximum. The source “sees” the 1080p capable HDfury X3 and therefore sets its resolution to 1080p, requiring you to manually change the resolution every time you want to use that source if your TV doesn’t support 1080p. Very annoying!
(2) Some displays may run hot or even malfunction if feed a resolution that is too high such as 1080p. If you know your display doesn’t like 1080p, turning it off in the HDfury X3 adds some piece of mind and assurance that you’ll never accidentically feed it too high a resolution.
How do I limit the HDfury X3 to only allow 1080i?
You can limit one or both of the HDMI inputs on the HDfury X3 to only allow 1080i. Lift the little panel found on the back of the HDfury X3. To turn off 1080p and 24Hz (24p) support for input 1, set DIP switch 7 to OFF. To turn off 1080p and 24Hz (24p) support for input 0, set DIP switch 8 to OFF.
How do I re-enable 1080p support in the HDfury X3?
Lift the little panel found on the back of the HDfury X3. To turn on 1080p and 24Hz (24p) support for input 1, set DIP switch 7 to ON. To turn on 1080p and 24Hz (24p) support for input 0, set DIP switch 8 to ON.
How many EDID banks does the HDfury X3 have?
4 EDID banks (2 per input). They are user programmable. By default EDID 0 supports 1080p FULLHD and 24p refresh rate, and EDID 1 supports up to 1080i with 24p refresh rate disabled.
How do I tell the HDfury X3 which EDID bank to use?
Lift the little panel found on the back of the HDfury X3 and set DIP switches 7 and 8 as follows:
– To use EDID 0 (1080p, 24p refresh): Set DIP 7 and 8 to ON.
– To use EDID 1 (1080i max, no 24p refresh): Set DIP 7 and 8 to OFF.
Powering the HDfury X3
Do I need to use the HDfury X3 power supply?
Yes. Due to the advanced features, the HDfury X3 draws more power than previous HDfury models. The HDfury X3 power supply must be used at all times. All of the HDfury.com HDfury X3 kits come with a power supply. An extra power supply may also be ordered on the HDfury X3 order page.
Is the HDfury X3 power supply the same as that used by the HDfury1, HDfury2, and GammaX?
No. The power supply for the HDfury1, HDfury2, and GammaX kits are 0.5A max current. The HDfury X3 power supply can supply up to 1.0A. Do not use an HDfury1, HDfury2, or GammaX power supply with the HDfury X3.
What sort of power supply does the HDfury X3 use?
If you want to source your own, the power supply must adhere to these requirements:
– Provide REGULATED (+/- 5%) 5VDC power with 1.0A min DC current
– Deliver the power through a small 0.65mm diameter center pin / 2.6mm outer diameter DC plug (like the one often used in cellular phone AC adaptor)
– Provide the correct polarity with ‘plus’ on the OUTER part of the plug and ‘minus’ (ground) on the small center pin of the DC jack.
Trying to use an AC/DC adaptor that doesn’t adhere to these three requirements may destroy the HDfury X3. Do not use the power supply from the HDfury1, HDfury2, or GammaX with the HDfury X3.
Miscellaneous:
The blue LED power light on the HDfury X3 is too bright in my light controlled Home Theater! Can I turn it off?
The easiest way to turn off the blue LED power light on the HDfury X3 is to simply place a piece of tape over it. Quick and simple. However, if you would like to deactivate it here’s how: Lift the little panel found on the back of the HDfury X3 and turn DIP switch 6 to OFF. To re-enable the blue LED power light, turn DIP switch 6 to ON.
Download
| HDFury X3 Firmware (Latest) | Version | Format | Size | Date |
|---|---|---|---|---|
| [20-MAY-17] HDfury 3 Latest FW – ZIP – 1.3 Mo | 1.0 | ZIP | 1.3 Mo | 20-MAY-17 |
| HDFury X3 User Manual | Version | Format | Size | Date |
|---|---|---|---|---|
| [20-MAY-17] HDfury X3 User Manual – PDF – 408 Ko | 1.0 | 408 Ko | 20-MAY-17 |
Kirk L –
Great Product! Got mine in two days, installed as is, and it worked. My video/audio rack is on the second floor of my house. No way hdmi cables would reach my plasma tv or projector located on the first floor. Component video cables were run when the house was built. Fury 3 is the perfect solution. Blue-ray to fury3 to receiver and now I get 1080 on my tv. Not into games or recording but this is a great bus driver. Thanks for a great product.
Dan –
Gents – I wanted to send a quick message to thank you for an outstanding piece of technology. For years I have been screwed over by the “industry” because I owned an older Pioneer Elite screen that doesn’t support HDMI… you know the drill. I recently needed to upgrade the Bluray player – and the oppo 103 doesn’t support component video out (you know the story here as well). Long story short – the HDFury3 may be the best piece of technology in the rack. I was able to wire up two devices and a third via hdmi input on the bluray… and the results are stunning. My GF (who unknowingly authorized the upgrade… lol) could immediately tell the difference in viewing quality and frequently requests “demos” for her friends. I have never felt that newer displays (the Kuro aside) were significantly better and worth the upgrade… now – they would be considered a downgrade for sure. Its added new life to my monitor and the savings will keep my ISF tech happy for years to come. Thanks again for keeping up the fight! In case someone infers… I do buy all my BDs, I have spent well over $20,000 in home theater equipment, I easily spend $1000/year on HD programming and I have no need to steal anything. If they HDFury didn’t exist – I would not buy more stuff.. I would find another hobby – guaranteed. Thanks again!
Tim –
Just finished installing and I’m quite impressed. I have an older Dwin CRT projector that must be forced negative sync. I was having to use a BUF2000 for that purpose and now I am able eliminate that device due to the HDFury3′s set up options. I am outputting RGB and my picture was shifted slightly right but with two or three pushes of the shift button it shifted right into place. I’m using this with the DVDO Edge and the combination is truly stunning. I’m outputting at 720p. What is truly remarkable are the blacks. I’ve always thought my blacks were pretty darn good and that my greyscale was set up right but I cannot believe how much better they look now. The unit itself is nice looking, although I think the HDfury2 was nicer but it’s buried in a cabinet anyway, and it is much larger that the original versions. With the trade in deal I know I made the right decision to upgrade and I’m extremely happy with my new toy.
Ron W –
Mine was delivered this morning pretty much as advertised. I was essentially looking for a “seamless” transition in performance from my HDfury2 and that is what I got. So far, so good. The inclusion of the little screwdriver to adjust any of the “tiny” dip switches was a nice “touch”.
Deborah –
I just wanted to let you know that I received the HDfury today, hooked it up and . . . OMG! My daughter and I played Bioshock and then watched MIB on Blu-ray, and all I can say is . . . Squee!! Thanks again!
Foghorn –
Received my HDFury 3 in the UK today. Using latest Amstrad (250GB) Sky HD box. Output set to 1080i. TV is Panasonic plasma TH-37PE50B using component input. HDFury 3 works straight out of the box. I set it up in about 5 minutes. You wouldn’t even know it was there if it was not for the nice blue LED! Brightness and colour exactly the same as “normal” TV no adjustments needed. No switching lag at all when changing Sky channels. Audio 3.5 mm to twin phono socket on TV from HDFury3 used. Works fine. I can now watch programmes in HD! Overall it performs just like I hoped that it would. Thanks guys you have saved me lots of money on a new TV.
Craig Rounds, official HDfury3 tester, professional calibrator (www.cir-engineering.com) –
Between the HDfury3 and HDfury2, the HDfury3 is MUCH better in every category and as a result the HDfury3 has a better image.
Michel –
It works fine and I am happy with the performance. This is the best HD-Fury so far…You were right… I would never hesitate to be the first one to buy any of your future products.
Ross H. –
I just wanted to send you guys some praise for an amazing product! I ordered the HDFURY III package that included the Gamma-x. This pair of products has absolutely breathed new life into my Sharpvision XV-Z9000U. I had been running it with direct component analog cables, and was mildly satisfied with the picture. The HDFURY III dramatically increased the resolution being delivered to the projector, and the GAMMA-X fixed the problems with not being able to see dark sections of movies. I am extremely satisfied, and would easily recommend this product to anyone that wants to breath new life into an older projector that is missing the HDMI connection.
Matthew K –
Hello, I purchased an hdfury gamer addition and it works great. I have tried 5 adapters/cables to try to hook up my ps3 to my projector through vga and none of them worked. I put all my hope into you amazing product and it works great. I also get dvd upscaling through the hdmi out 🙂 . Also, your shipping was outstanding. I live in the USA and usually shipping from Asia takes 2 weeks minimum. Your shipping took 2 days and it was free!!!!! Places in the United States rarely ship that fast to other places in the United States after paying for shipping. I just wanted to thank you for saving my projector. Your product is revolutionary and I hope you keep up the good work. Truly Amazing!
jaystickney –
I ordered an HDFURY 3 on Monday and it’s up and running on Wednesday. Three things that really impress me:
1. This product works as advertised! Just connect it an it works, and works great. There are products out there that claim to do the same thing, but don’t.
2. Shipping from Taipei to New Hampshire USA in 2 days for free.
3. I’ve saved some significant money buying the HDFURY. I upgraded my AV receiver and was thinking I would also have to buy a new display (and fish an HDMI cable through the wall) to get the full 1080P experience of my components. It turns out that my Panasonic professional series display supports 1080p24, but I’ve never used it, until now. And, I can use my existing in wall component cables.
Thank you HDFURY, I highly recommend your product.
Daniel Ricardo Lima da Silva (verified owner) –
I have an old Diamondtron PC CRT that was dim and kind of lifeless but I just dismissed it as being due to old age, I used it with one of those cheap HDMI to VGA devices you can find out there and never gave it much thought.
I did however needed the HdFury for the flexible sync capabilities and the added accessories.
Just for fun I hooked it up with the Mister FPGA to my PC CRT and WOW, just WOW.
It’s so vibrant, so clear, it has to be seen to be believed.
It also helps that the included accessories are of very high quality so there’s nothing degrading the connections.
Guys even the plastic of the power supply is of a quality I haven’t seen in years! It’s worth every cent and then some.
I highly recommend.