Enjoy Dynamic DV content from LLDV source on any HDR10 display.

Add DV support to any HDR10 display from any DV/LLDV capable source is now a reality! Boost your HDR10 display capabilities with a stunning new method that started a growing hype on the major AV forums out there with more than 200K+ views on AVforums and AVSforum
That so called “hack” or “trick” is basically enabling any HDR10 display to render dynamic DV content from any LLDV capable source. Result is the greatest boost in picture quality that one can get for the money.
If you do not trust your team words on that, have a read to what people that tried this method are reporting on it:
I’m in utter amazement that this hasn’t been more of a huge discussion and topic for what it gives the layman HT buff without a large budget!
Something is going on here as to the reasons why.
Do people just not get what this brings to the table as far as image quality that can be had as compared to spending multiple thousands more on ultra high end gear such as the Lumagen RP, Envy, etc.???
People should be flocking to this solution if they can’t afford those high ticket items.
As has been stated, it’s clearly better visually than the Panasonic Optimizer and slider and reportedly only slightly less performance wise than those much more expensive alternatives.
Boggles the mind really, but then again we humans are a strange, manipulatable bunch, aren’t we.
I have concluded my testing. IMHO the testing has been a success.
Using the HDFury Vertex on both the ATV4K and Sony x800M2 player, has produced better results than running the ATV4K in HDR10 mode, or using either the HDR2020 or SDR2020 modes on the UB820.
I can say, while both the JVC DTM and Lumagen DTM are a step up, the performance of the ATV4K and X800M2 using the HDFury to spoof the DV LLDV Profile 5 exploit, produce outstanding results. And at a fraction of the cost of a JVC projector upgrade or a new or pre-owned Lumagen.
AppleTV 4K and Disney+ playing Toy Story 3 with DolbyVision LLDV on BenQ LK990 = OMG WOW!!!
Also, to those here and elsewhere that keep reporting that you shouldn’t use this for HD SDR and HDR10 upconversion to DolbyVision, you couldn’t be further from the truth! All you need is a few tweaks and settings adjustments and you WILL BE treated to an utterly amazing image that should knock your socks off!!! I watched the Sunday Night Football (American) game between the Patriots and Texans last night using this DV upconversion method on an AppleTV using the Channels DVR app playing on my LK990 and I’ve never seen a more natural looking projected HD sourced image in my entire life, and I’ve been doing this for 30+ years! It was literally breathtaking seeing the realism, 3-dimensionality and detail I was looking at on screen! Dolby and Sony have created some utterly amazing algorithms apparently and it shows! Now I see why they force DolbyVision on their devices when you turn it on, because they KNOW already and it’s up to you to unlock its potential. This totally smokes the Panasonic Optimizer!!!
As I said previously, it wasn’t “like looking out a window”, it was like “actually being on the field with them”
The best result with my system has been with the Panasonic UB 820 on Dolby Vision / HDR10 discs. On 1080p discs, it has been the Oppo 203 with forced DV. Titles like “Avatar” ,”Lord Of The Rings” and many more has really come to life !
With some adjustments made to both players and my PJ, this hack works sooooo good !
I have to say, there were more “OMG” moments with this solution than any other I can think of in recent memory. The results I see astonish me for how little effort and money has to be invested and how it just makes the image so much more “natural”, which is the best way to describe the effect. People and places just look more real, the image takes on such an image depth that it’s breathtaking and as I said, makes it look more like actually being in there with them instead of how others have described things in the past by saying “it’s like looking out a window”, so even more realistic if that makes sense.
4K HDR makes things look sharp and clear with lots of details. This LLDV solution takes it a step further and just applies an incredible realism on top of this. Whatever Dolby does to their signal, to me it’s absolutely incredible
Wow, wow. Everything DV looking allot better, I have my Apple TV set to Dolby vision with match and frame rate set. Vertex 2 been updated to latest firmware. Sdr is correctly showing as is Dolby vision/hdr10 material, getting full Atmos as well
After watching just streaming via Apple TV in 4K Dolby vision/Atmos via, iTunes, moviesanywhere and Disney + app. Wow again, best I have ever seen in terms of colour and picture looks amazing. Just watched sections of Dr strange, avengers endgame, coco and toy story 3. I am going to have to revisit allot of films that are in Dolby vision. Colour looks more like my OLED but on a 120 inch screen. This hack has to be the best thing I have done and now getting allot more out of a great projector. For the cost of £320 for the vertex 2, it’s unbelievable. I am in no rush to change my projector. The price I get movies in Dolby vision on iTunes US and UK account is so good, plus all of Netflixs show in Dolby vision. I am a complete believer in this and can’t recommend it enough.
This hack works It’s the real deal.. I finally got around to setting mines up over the weekend and the results are freaking amazing.. No more dark scenes i can finally watch everything the way it should be..
I watched frozen through the appletv and it blew me away.. i couldn’t believe my eyes.. amazing
Then i played the uhd disc of how to train your dragon through the oppo and that took it to another level.. It works for sure and I am 100 percent happy with my projector now..
This hack has made a already excellent projector now onto another level. Just watching some scenes from Avatar on Blu-ray using the Sony UHD sending via the Dolby vision hack with the vertex. Wow, it looks amazing. Picture looks so so much better than via the Panasonic 420 UHD player. I think I am going to be re watching allot of stuff again.
Yeah this thing is amazing.. I can get another 5 years out of my projector now for sure thank god i waited and didnt spend the thousands of dollars i was going to spend on a lumagen or envy..
My projector has honestly never looked this good. So for the outlay of the Vertex 2 and Sony x800m2 UHD player. I am over the moon with results I am getting too and hope others are enjoying it. If you have not tried it, I suggest you do
I streamed angry birds 2 DV last night through apple tv and it looked ridiculously amazing.
Just watching edge of tomorrow Blu-ray via Sony x800m2 Dolby vision, wow, best it has ever looked.
Picked up the JVC DLA-N5(RS1000) yesterday.
Just got it up on the shelf for my PJ and tried it out of the box.
The PQ is amazing, and the hack makes it even better !
Note that I only did some testing with “The Martian” and “Grease”, with my eyes ONLY.
Tried with LLDV on and off, and the difference is smaller with this PJ.
But the punch in the colors, and overall performance IS better.
So, even if you got a DTM projector; Go fo this hack !!
While all newer sources are all capable to output DV and LLDV, some olders ones might be limited to DV, below is a current list of sources capable to output LLDV.
List of sources capable of LLDV output for any DV content:
– Sony Players (UBP-X700, UBP-X800/M2, UBP-X1100ES …)
– Apple TV 4K
– Shield Pro
– Xbox One X/S
– Panasonic UB820/UB9000
– Oppo 203/205
– Fire Stick/Fire Cube (Netflix/ATV App)
– Chromecast (Netflix)
List of sources capable of LLDV output for DV, HDR10 and SDR content:
– Oppo203/205
– Apple TV 4K
– Sony UBP-X700, UBP-X800/M2
This method can be performed on any HDR10 display using Vertex2/Diva or Maestro. If you own a JVC PJ with custom gamma curve or if you have a PJ that can be manually forced in HDR mode, then you can perform this method using Vertex1, Integral2 and Linker as well.
To get started, we recommend reading both linked threads at the beginning of this post as well as the following guide:
Vertex2 setup guide by user Vollans on AVSforum.
Thanx to power user Claw from AVSforum who posted the below info and links:
1 – Custom Sony A1 LLDV EDID 5 in combination with Dominic’s A1 custom color profile for JVC. This was the first solution that reduced the red tint we saw when using the A1 LLDV EDID 5. JVC projectors only.
JVC custom A1 color profile download Link:
https://www.avsforum.com/forum/attac…2&d=1581466297
Procedure for loading JVC custom color profile:
https://www3.jvckenwood.com/english/…e_en_v1_00.pdf
2 – Mark’s custom BT2020 EDID in combination with BT2020 color profile in any display. This is a good option for those that don’t want to mess with color profiles in your display. Every HDR display should include a BT2020 color proflle.
Custom BT2020 EDID download Link:
https://www.avsforum.com/forum/attac…2&d=1581851932
3 – Diva/Vertex2/Maestro Automix mode default DV data block with DCI-P3 primaries combined with a DCI-P3 color profile. This option provides the capability to customize the DV data block field values from the defaults if you have one of the new HDfury devices.
Manni’s JVC-only custom DCI-P3 color profile download link for JVC models that don’t have a built-in DCI-P3 profile:
https://www.avsforum.com/forum/attac…0&d=1506168265
Procedure for loading JVC custom color profile:
https://www3.jvckenwood.com/english/…e_en_v1_00.pdf
4 – Mark’s custom DCI-P3 EDID in combination with a DCI-P3 color profile. This is a good option for those who have an older HDfury device but want to use a DCI-P3 color profile.
Download link:
https://www.avsforum.com/forum/attac…2&d=1584451347
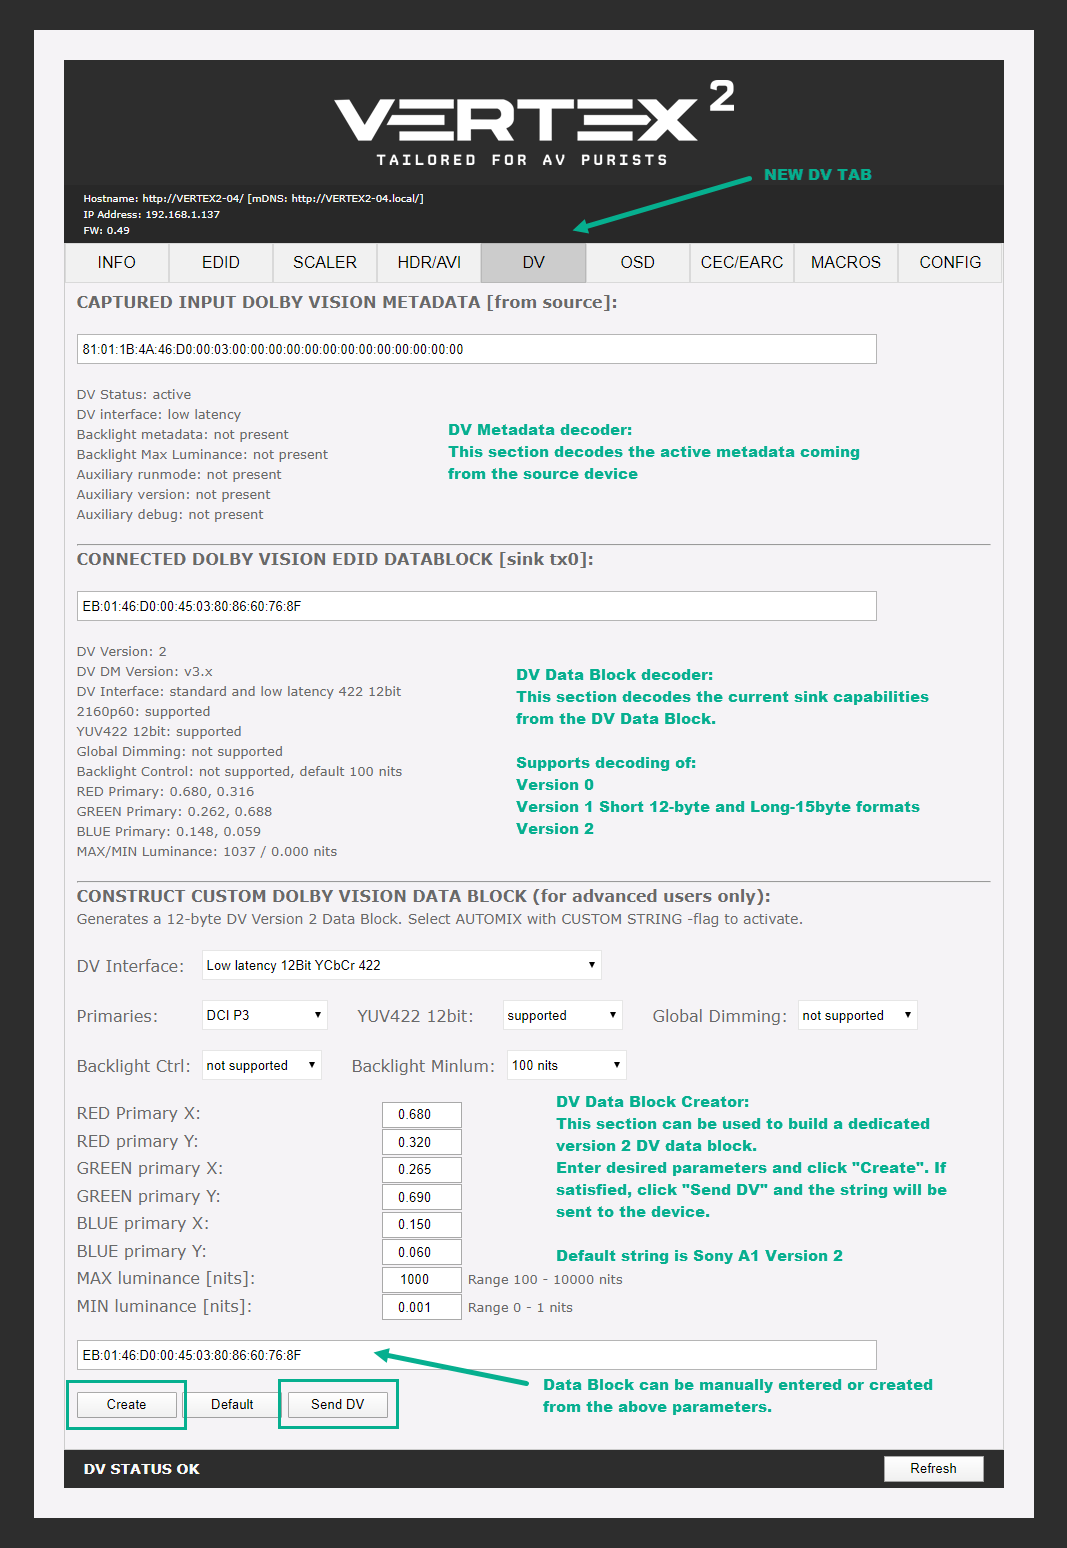
Our dev team added a whole new DV section on Vertex2/Diva and Maestro that allow to decipher DV metadata, decode DV datablock and create your own DV Datablock
Last but not least, we want to thank all individuals who worked on this method and added test results, tweaking tool, custom edid, instructions and more to bring it further.
Special thanx goes to: HarperVision, Bmandra, Claw, Markswift2003, Bytehoven, Dominic Chan, Vollans..